Here we present an exercise to get you acquainted with git - without knowing in detail what it is. Two people will work together in the same repository, namely the owner and the collaborator. The owner starts, the collaborator may help.
Instruction for repo owner
Go to https://
github .com /new. This will lead to a page where you can create a new repository. Choose a descriptive Repository name. Choose it wisely as your repositories will be shared with teachers (or future colleagues). In some cases, like this online book, the repository name will be part of the URL.
Choose visibility to private, Add Readme (on) and click on the green button with Create repository.
Now you have a repository where you can share and synchronize materials.
Click on Settings (in the top right corner of your screen) and click on Collaborators in the left-hand menu.
Click the Add people button under the Manage access heading.
Type your partner’s (or partners’) username and click on Add
<username>to this repository (where<username>is your partner’s username).
Partner accepts invitation
Your partner will receive an email with an invitation to collaborate on the repository. Once accepted, both of you can make changes to the repository, though for now only through the GitHub website...
Going local
These steps will make your work locally available.
Open a terminal and navigate to the root project folder - see Using the terminal for instructions when needed.
Using the terminal, run
git clone <repo>where <repo> is the url of your repository. You can find this URL by clicking the big green button <> Code, and copying the HTTPS URL.
Open Visual Studio Code and open (File/Open Folder) the folder where your repo was cloned into. The only file that will be in it will be the README.md file.
Exercise
You and your partner can now take turns in writing a poem.
Pulling & Pushing changes
When you have made a local change, your partner won’t see it and will not be able to use it. You’ll have to push your work to the central server (GitHub). In VSC, go to source control using the icon:  . You will see something like Figure 1. Follow these steps:
Pushing
Type a Message in the inputbox just above the blue ✓ Commit button.
Click for the dropdown menu and choose Commit & Push.
This will push your changes to the central server.
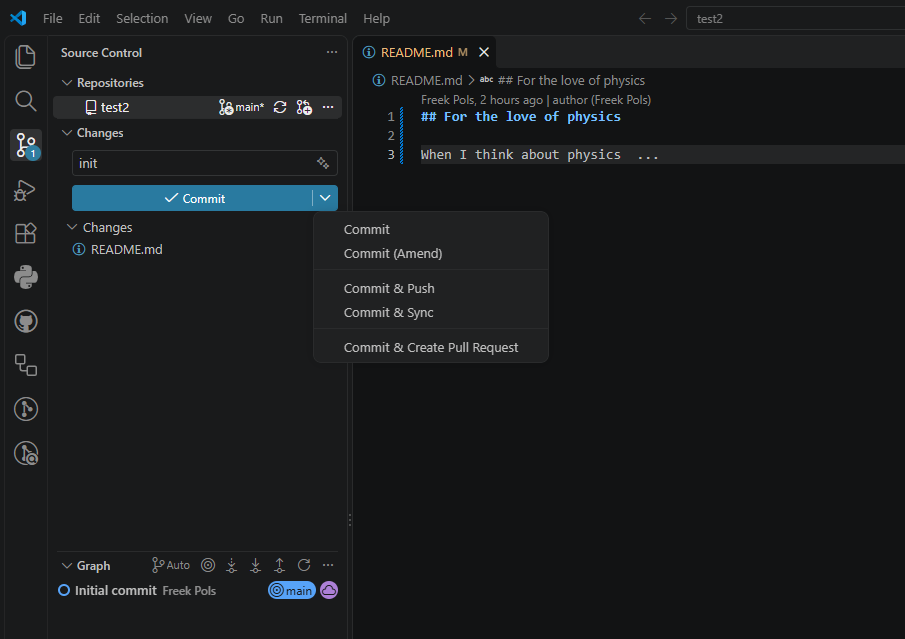
Figure 1:A screenshot where to find the source control.
Your work will be now be available for your partner. But in order to work on it, it has to be pulled in locally.
Pull
Open Visual Studio Code, and make sure you have opened the folder of the local repo.
Go to source control using the icon:
.Next to change, click the three dots ... and choose Pull, see Figure 2
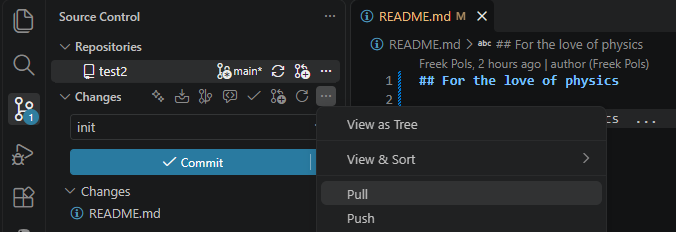
Figure 2:A screenshot where to find the source control and pull from GitHub.
Using the terminal
You are probably used to working with a graphical interface (and your mouse): you click the location you want to go to. In the terminal, you work with commands. You navigate through the terminal using cd <folder> (where <folder> is the folder you want to go to).
Some basic commands:
Use
cd ..to go up one folder.Use
lsordirto see the contents of the folder you are in.To switch to another drive, type the drive letter followed by a colon (for example,
D:).Use
mkdir <folder>to create a new folder (where<folder>is the name of the new folder).Use
rmdir <folder>to remove an empty folder (where<folder>is the name of the folder you want to remove).Use
rm <file>to remove a file (where<file>is the name of the file you want to remove).Use
code .to open the current folder in VS Code.