01 Magnifying Glass#
Aim#
To show three ways to use a magnifying glass.
Subjects#
6A70 (Optical Instruments)
Diagram#
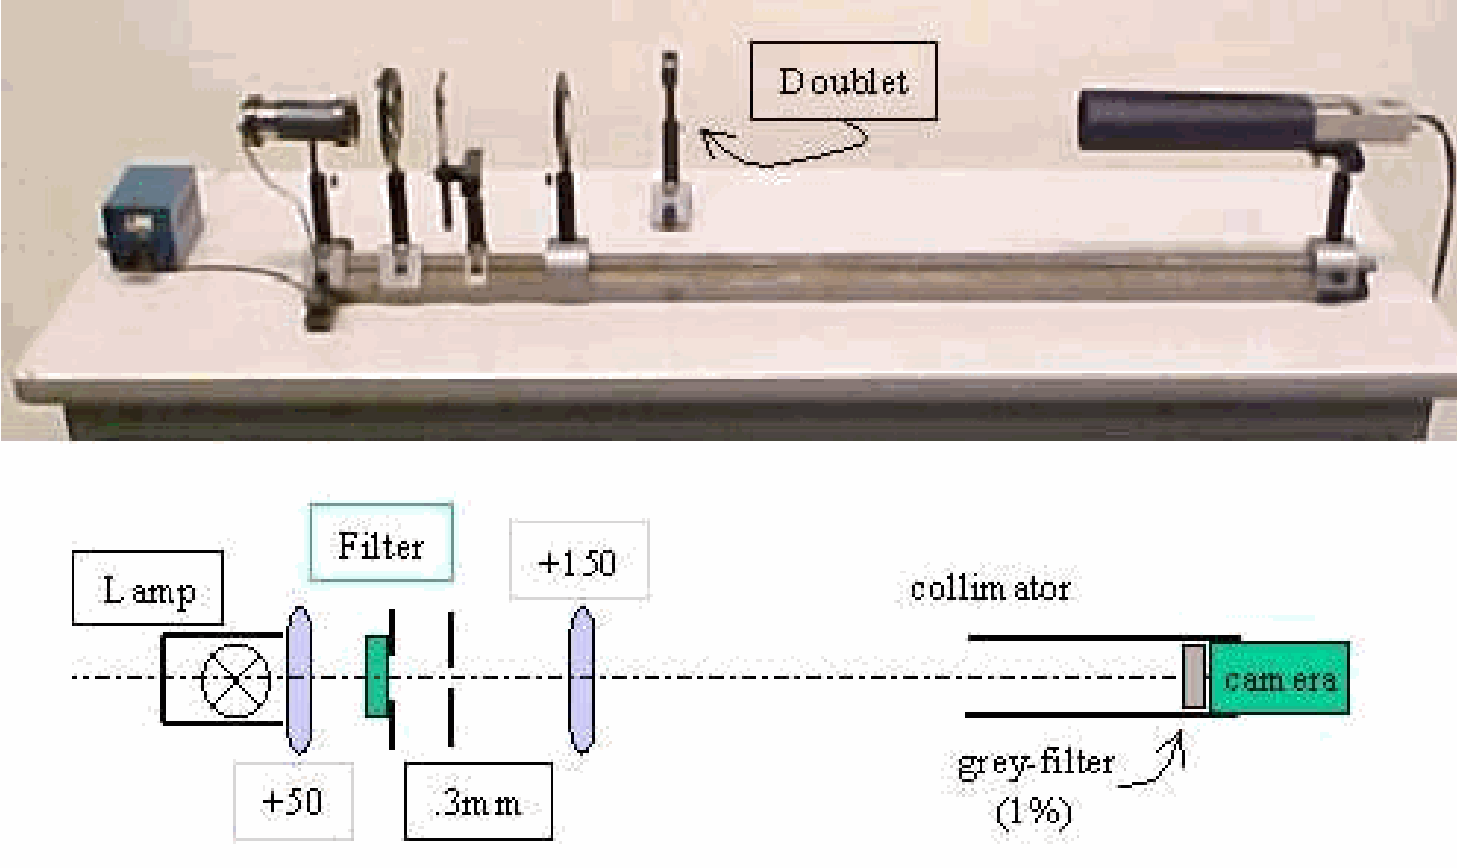
Fig. 583 .#
Equipment#
Optical rail (\(2\mathrm{~m}\)).
Measuring tape.
Ruler, \(1\mathrm{~m}\).
Two position markers.
Video beamer or monitor. “Object”:
Lamp, \(12\mathrm{~V}/100\mathrm{~W}\).
Sheet of graph paper, clamped between acrylic sheets ( \(18 \times 18 \mathrm{~cm}^{2}\) ).
“Eye”:
Video camera without lens.
Iris diaphragm.
Lens, \(\mathrm{f}=+300 \mathrm{~mm} ; \mathrm{d}=75 \mathrm{~mm}\).
Tube, \(\mathrm{I}=25 \mathrm{~cm}\); \(d=10 \mathrm{~cm}\); dull black.
“Magnifying glass”:
Lens, \(\mathrm{f}=+150 \mathrm{~mm} ; \mathrm{d}=75 \mathrm{~mm}\).
Presentation#
On a table there is a piece of text. You stand close to the table. First show what you do when you use a magnifying glass. There are three possible ways:
(a)Hold the lens \((+150 \mathrm{~mm}\) ) very close to your eye and show the students that you have to bend towards the text until you can read it sharp. The distance between lens and text is smaller than \(\mathrm{f}_{\text {lens }}\) (we measure around \(10 \mathrm{~cm}\) ).
(b)Hold the lens \(15 \mathrm{~cm}\) (=f lens ) away from the text, allowing you to relax your eye. When reading your text you still have to bend.
(c)Hold the lens a comfortable distance away from the eye so that you do not have to bend. Adjust the distance between lens and text until a clear enlarged image appears. The lens has to be close to the text now (always a distance smaller than \(15 \mathrm{~cm}\) ). This is how people mostly use a magnifying glass.
Now we turn to the demonstration set up (see Diagram).
First we use only the “Eye-part” and focus it at an object in the lecture-room far away (infinity): Adjust the iris diaphragm and eye lens position to obtain a clear image on the screen. This situation corresponds to the eye muscles completely relaxed. At this position of the eye lens a marker (1) is placed on the table.
“Eye” and “Object” are each at the outer ends of the optical rail. The lamp is switched on and illuminates the graph paper diffusely. The iris diaphragm and the position of the eye lens are adjusted until a sharp image of the graph paper is seen on the screen. On the screen the distance between the mm-lines of the graph paper is measured \(\left(x_{1}\right)\). This situation corresponds to normally reading a text on the table with an unaided eye: The “Object” is at the so-called near point. Also place a marker (2) at the position of the eye lens in this situation.
(a’)Leaving the eye lens in this position, the magnifying glass is fixed to the eye lens by means of tape. The “Object” is shifted towards the “Eye” + magnifying glass until the image of the graph paper is sharply seen on the screen (the “Eye” again sees the virtual image at the near point). On the screen the distance between the mm-lines of the graph paper is measured \(\left(x_{2}\right)\). The magnification equals \(\left(x_{2} / x_{1}\right)\).
(b’)Again focus the “eye lens” at infinity (the first marked position). In this way the “Eye” will view in a relaxed way. The magnifying glass is positioned \(15 \mathrm{~cm}\) in front of the object, in order to obtain a virtual image at infinity. The “Object” + magnifying glass combination is shifted towards the “Eye” until the image of the graph paper is sharply seen on the screen. On the screen the distance between the mm-lines is measured \(\left(x_{3}\right)\). The magnification equals \(x_{3} / x_{1}\).
(c’)The “Object” is placed at the end of the optical rail and the magnifying glass closer than \(15 \mathrm{~cm}\) to the object. The eye lens is shifted until a sharp image of the graph paper is seen on the screen. On the screen the distance between the mm-lines is measured \(\left(x_{4}\right)\). The magnification equals \(x_{4} / x_{1}\).
Notify the results obtained and discuss them.
Explanation#
When no lens is used, the object is at the near point and observed at an angle \(\alpha_{u}\) (see Figure 584).
When the lens is directly in front of the eye, the image is virtual and erect and must be observed at near point. To have this, the object has to be less than one focal length away from the lens (see Figure 584b). Analysis shows that the angular magnification equals \(M=\frac{\alpha_{a}}{\alpha_{u}}=\frac{d_{0}}{f}+1\)
Fig. 584 .#
When the lens is placed a distance \(f\) from the object, angular magnification becomes
Still the eye is close to the object. (see Figure 584c) (Theoretically a larger distance between magnifying glass and object is possible but then distorsion occurs, since the eyelens sees the imageforming rays no longer paraxial.)
When the object is a comfortable reading distance away analysis shows
(see Figure 584d).
So for maximum magnification the magnifying glass should be hold closely to the eye. To have a more comfortable situation you have to be content with a lower magnification.
Remarks#
The first part of the demonstration can be done also by handing out lenses to the students so they can do the three ways themselves.
Sources#
Hecht, Eugene, Optics, pag. 212-215
The Physics Teacher, pag. Vol. 39, May 2001
Giancoli, D.G., Physics for scientists and engineers with modern physics, pag. 853-854